We developed a complete Windows-based editable software named “Prime Systems Integrated Software” for the users to create logic to control the hardware connected with the PC.
Connect Hardware: Software can accept inbound signals and send outbound commands through the following hardware:
- The Jupiter control module connects with the PCs through RS-485
- Motor drives are connected to the PCs through Modbus to send and accept variable signals.
- Weight modules are connected to the PCs through TTL input.
- Network cameras connected to PCs with USB and WiFi.
For Installation: Users will use the Windows installer package to install the software.
After installation, there will be an Integrids shortcut on the desktop.
For opening the software: Double click on it to open the software:
Run the Save Project Option: If the user wants to run a saved project, then click on the
Run The Saved Project Button and it will ask for the project you want to save. Select the required project and click on OK.
Code Screen: We have created a code screen for this software that will be shown when the user click on the Run button:
Start Creating Option:
Devices Screen: If the user clicks on the start creating option, they will be on the testing page for the devices. Here, users will be able to test the connection of their devices by selecting the applicable parameters.
Fresh Code Screen: The fresh code screen looks like this, and users can go to the code screen and make their logic by dragging the right block.
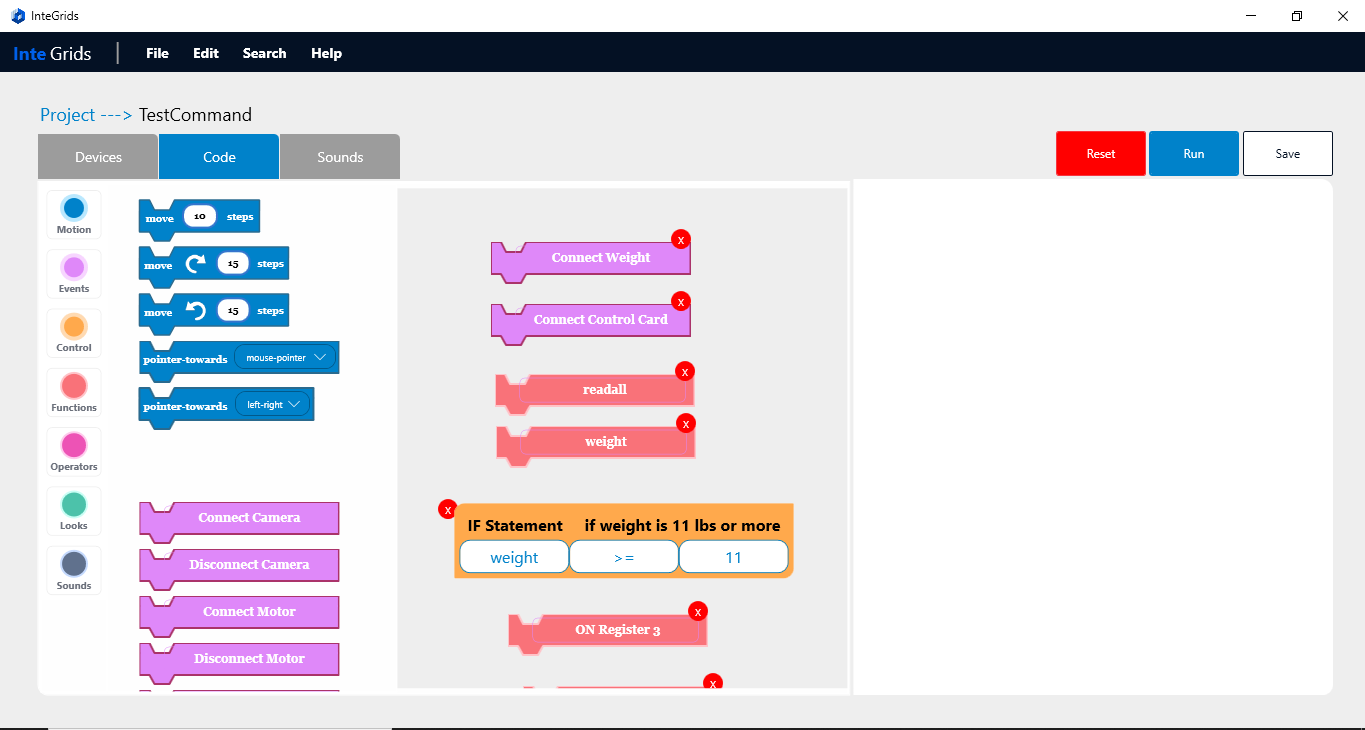
After completion of the logic, the user can click on the Run button, and if he wants to save the project, he can click on the Save button available in the top right corner of the screen.
After clicking on the Run button, the HMI screen will come up. Click on the "Start Program" button, and it will run your block successfully. If you want to stop the execution, then click on the “Stop Program” button.

 Mean Stack Development
 Vue JS Development
 Javascript Development
 React JS Development
 Angular JS Development
 Next JS development
 Java Development
 Python Development
 Django Development
 Cherrypy Development
 C# Development
 ASP.NET Development
 NodeJS Development
 Laravel Development
 CodeIgniter Development
 Zend Development
 Ruby on Rails Development
 CakePHP Development
 PHP Website Development
 Symfony Development
 Drupal Development
 Joomla Development
 Wordpress Development
 .NET Nuke Development
 Kentico
 Umbraco
 .NET MAUI Development
 Xamarin Application Development
 iOS Application Development
 Android Application Development
 Android Wear App Development
 Ionic Development
 Universal Windows Platform (UWP)
 Kotlin Application Development
 Swift Application Development
 Flutter Application Development
 PWA Application Development
 Offshore Software Development
 Custom Application Development
 Front-End Development
 Full Stack Development
 AI & Machine Learning
 Custom CRM Solutions
 Flask Software Development
 Electron JS Development
 ChatGPT Development
 Magento Development
 Magento 2.0 Development
 Magento Enterprise
 Shopping Cart Development
 Prestashop Development
 Shopify Development
 Open Cart Development
 WooCommerce Development
 BigCommerce Development
 NopCommerce Development
 Virto Commerce Development
 AspDotNetStorefront Development
 RaspBerry Pi
 Firmware Software Development
 ESP 32 Software Development
 Embedded Development
 Internet of Things
 Nordic Development
 .NET Application Development
 Microsoft Dynamics CRM
 VB .NET Development
 Sharepoint Migration
 ASP.NET Core Development
 ASP.NET MVC Development
 AJAX Development
 Agile Development
 Microsoft Bot
 Microsoft Blazor
 Microsoft Azure Cognitive
 HTML 5
 UI/UX Design
 Graphic Design
 Adobe Photoshop
 XML Application Development
 Cloud Computing Solutions
 Azure Cloud App Development
 AWS Development
 Google Cloud Development
 SQL Programming Development
 MySQL Development
 MongoDB Development
 Big Data
 Robotic Process Automation
 Social Media Marketing
 Search Engine Optimization
 QA Testing
 Software Testing
 Software Security
 Maintenance And Support
 I.T. Consulting Services
 Business Intelligence
 YII Development
 Data Analysis
 Alexa Skills Development
 On Demand App for Mobile repairing services
 On Demand App for Car Service Booking
 On Demand App for Cleaning Services
 On Demand App for Pharmacy
 On Demand Dedicated Developers